Jan 28

Polyaspartic Coating for Concrete

What if in the sea of concrete sealants available on the market today, there was a new type of product that answered just about every operator’s wish list for achieving stunning looking concrete surfaces time after time? Too good to be true? What’s the catch? Let’s see what some of the claims that have been made about polyaspartic sealers:

What are the main Benefits of polyaspartics?

– Can be applied at any temperature (-30°F to 140°F).
– Bond to any concrete surface as long as it is prepped properly.
– Very low viscosity material can even seal small cracks due to its high flexibility.
– Produce a high film build with a single coat reaching 8 mils.
– Rapid curing to full strength  (from 5 to 120 minutes depending on the formula used).
– No or Low VOCs (volatile organic compounds) because made with high solids content.
– Superior stain and corrosion resistance.
– Greater impact resistance than epoxy or urethane coating.
– UV stable means it will never turn yellow and is a UV protected layer to the underlying coats.

That’s a pretty impressive list by any account!

So what are polyaspartic sealers made with?

Basically a two-part a polymer coating material where a resin is mixed to a catalyst to create the curing reaction that hardens the material. It has been compared to epoxy and was first invented in the mid 1980’s by Texaco Chemical Company. The original formula has since been experimented and vastly improved with a myriad of variables.

What are they best used for?
Residential and commercial applications.

Indoor:
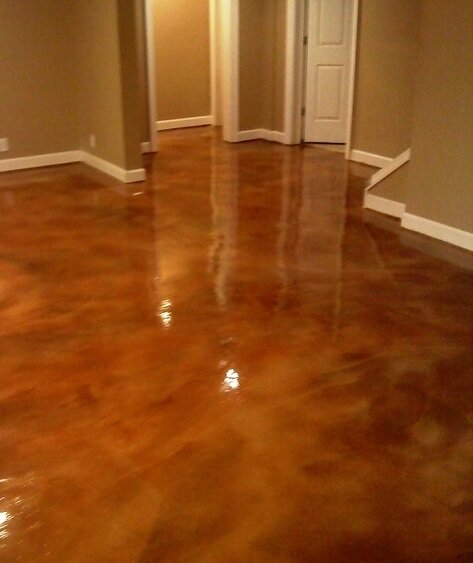
Garage floors, auto showrooms, warehouses because of their high resistance to stain, heavy traffic, abrasion and chemical corrosion. The fact that an entire garage floor can be completed in 5 hours (instead of 5 days for an epoxy floor) when using polyaspartic coating, makes it stand out from the competition. Quartz sands or vinyl flecks can even be added to the formula for a more decorative finish look. While the cost of material may be a little higher than epoxy, the time saving makes it a superior alternative.

Great for sealing concrete counter tops due to their ability to resist acidic materials like lemon, wine etc. (link to other article)

polyaspartic coatingOutdoor:
Bridges – when embedded reinforced steel in bridges are sealed with polyaspartic coating, the structure is protected from the corrosion caused by fresh or sea water. All concrete piles of the 7-mile San Mateo/Hayward bridge in California received a 3-coat application of polyaspartic polymer during its construction, providing UV protection and deterring barnacles from clinging to the structure.

Limitations & risks

– Insufficient surface preparation can lead to disastrous results.
– Polyaspartics are impermeable so new floors should be cured for 28 days or more before applying sealer. If the substrate is contaminated or moisture is found on the surface, the coating will stick to it rather than the surface!
– Surfaces that have been cleaned with acid etching will not work because it lowers the pH and can cause delaminations problems.
– Potlife of some products can be less than 20 and as a result not adequate for large jobs.
– Product’s low tolerance for mis-application and poor installation practices.
– Not appropriate for floors with high moisture vapor emission rates.
– Fail to properly prepare will yield costly failures and rework.

CONCLUSION:
As for all new technologies, there is a phase of trial and error and a definite learning curve that are required. The most important thing to remember is that polyaspartic sealers are not for all jobs. The appeal in finishing a flooring surface in a day shouldn’t outweigh the other factors to consider. The two main causes of adhesion failure are the underlying surface has not been adequately prepared and when moisture is found on the surface. As long as you follow the manufacturer’s instructions, you should end up with a stunning results.

Examples of polyaspartic products:
InstaDrive from Kamcrete
Rapid 1000 from Rapid Coating Systems
Roll On Rock from Versatile Building Products

Have questions about concrete finishing, concrete pumps or accessories, give us a call at: (503)283-2105.United Equipment Sales


Additional reading
Different types of polyurea
Polyaspartic floor coating uses
Buyer’s Guide to polyaspartics


Share
Jan 09

Tips for Cold Weather Concreting

Record low temperatures

Record low temperatures

With news of polar arctic weather sweeping through the Midwest and Eastern part of the country, one can’t help thinking about the movie The Day After and wondering if this is just a passing thing or something more serious! With record low temperatures (-20!) bringing many cities to a grinding halt, we thought it would be interesting to find out what are some of the challenges of pouring concrete in cold weather and recommended mitigation methods.

So how cold is cold? According to the American Concrete Institute (ACI) the definition of cold-weather concreting, as stated in ACI 306 is, “a period when for more than three successive days the average daily air temperature drops below 40 degrees Fahrenheit and stays below 50 degrees Fahrenheit for more than one-half of any 24 hour period.”  Based on this information and this week’s nationwide temperatures, no construction is happening in most of the country! Or is it?

SPECIAL PLANNING FOR LOW TEMPERATURES

To ensure that concrete placed in cold weather will last a long time, proper planning is required. This includes: selection of cement mix, proper mixing, placing, curing time, finishing techniques and overall protection of the site and concrete. In cold weather, the curing period takes longer because the lower rate of strength gain. Make sure to take into account the transportation time from the plant to the point of placement as it can have a major impact on the temperature of the mix.

If at the time of pouring, temperatures drop below 40-50°F, you can heat the water or the aggregates to reach the desired temperature. Heating cement is not an option!

Concrete operators can also use a low slump concrete for flatwork and lower water/cement ratio mixes because it will reduce the setting time and bleeding water. Selecting a concrete mix that contains admixtures that accelerate or a Type III Portland cement, Hi-Early cement that will greatly help reducing the protection time from freezing. It is especially important to increase the quantity of accelerated admixtures (PolarSet®, DCI®, Daraccel®, Gilco® or Lubricon®) towards the end of the pour to produce a more consistent set and avoid the results of cooler mixing water. It will also speed up the setting time of the last concrete batches so that the entire concrete area can set at the same time.

THE MAIN RISK: PREVENT THERMAL CRACKING

Freezing

Freezing

It is essential that every surface that will enter in contact with the concrete is free of frost, ice and snow. Whether it is reinforcement, embeds, forms, fillers, or ground

The first 24 hours after the concrete is poured is the most critical period because it is the usual amount of time that is required to reach its minimal strength of 500 pounds per square inch. If freezing occurs while the concrete is fresh or has not reached this minimal strength, ice will form in the frozen water altering the cement mix which in turn will damage its overall strength. So at 500 psi, the cement is able to resist the expansion caused by freezing water and be safely removed from the forms. As a rule of thumb, an 18°F (10°C) drop in concrete temperature will double the setting time and make it more vulnerable to freezing. Use the maturity method to verify that the concrete has reached the proper strengthening level.

PROTECTIONS TO KEEP TEMPERATURES ABOVE 50F

Insulated blanket

Insulated blanket

Some of the most commonly used methods to keep temperatures above 50° Fahrenheit are: evaporation reducers, curing compounds, polyethylene sheeting and insulating blankets. Cover protruding rebars and make sure that they don’t blow away at night when the temperatures are even lower. If the temperatures are very low, you can use a combination of electric heated blankets and insulated blankets. If the site is subject to cold winds, a 6-foot wind breakers is recommended to reduce evaporation and drop in temperature. A more costly method involves heated enclosures that can be made of wood, canvas tarpaulins, or polyethylene. Heaters can be direct-fire, indirect-fire or hydronic systems (use glycol/water solution to produce heat in a closed system of pipes). Adequate venting to the outside must be included to protect workers from inhaling carbon monoxide gas. Operators should make sure that the heaters are properly fueled to last through the night.

Two elements will affect the quality of curing: moisture and temperature. In cold weather, little to no moisture is required for curing in cold weather conditions. It is recommended to keep the concrete temperature above 40° degrees Fahrenheit for three to seven days.

WHAT IF TEMPERATURES DROP BELOW 50F?
If during the three to seven days that followed the pouring, the temperatures drop below 50 degrees Fahrenheit or are near freezing, then the time has come for a good curing compound to create a  protective liquid membrane (usually made of a water based hydrocarbon resin).

MAINTENANCE DO’s AND DON’Ts

Do make sure that no extra water or bleed water is on the surface of the concrete.
Do prevent ice from forming at all costs (this will cause an immediate drop in hydration and strength).
Do watch for hardened concrete area and make sure that they don’t occur.
Do leave forms in place as long as possible because they distribute heat more evenly during the setting phase.

Don’t overworked areas that seem to be setting more slowing.
Don’t seal freshly placed concrete or if bleed water is visible.
Don’t turn off heat too quickly as the difference of temperature between the enclosed area and the outside could cause thermal cracking (days and weeks may be required in case of large structures)

Have more questions about cold weather concrete or concrete pumping? Call Dick at (503)283-2105.

United Equipment Sales


Further reading:

Additional information can be found in ACI 306.1, Standard Specification for Cold Weather Concreting, ACI 306R, Cold Weather Concreting

Technical Bulletin
Role of Concrete Pouring


Share
Jan 02

Transform Old Concrete With Cement Stain

Boring concrete

Let’s be honest, while concrete is a great economical and lasting option, its look over time can turn a garage, a sun room, a basement, a porch or a patio into a plain eyesore! But do not despair, there are a number of options that can completely transform the look of old boring concrete at a fraction of the cost of replacing or pouring new concrete. One of this option consists in applying cement acid-stain, available in various colors, to give a brand new look and protective layer.

One of the advantages of using cement stain over paint, is that cement stain is permanent, won’t fade or peel. It creates marbled variations of color on cured concrete by chemical reaction with the minerals in the concrete. Concrete resurfacing results will vary greatly due to variations in the underlying concrete.

Concrete stain flooring

Concrete stain flooring

MATERIAL NEEDED:

Paint tray
Paint brush, spray bottle and/or pad
Paint roller
Tarp or plastic roll
Concrete stain (comes in solid and translucent colors)
Concrete sealer

PROCESS

STEP 1: CLEAN
As for all painting job, the first step is to clean the surface of oil, dirt, mud, dust and residues. Use coca cola to remove oil stain on garage floors. Use a broom, a brush for the areas that need the most work. You can also power wash the area but make sure that it has plenty of time to completely dry.  Skipping the drying process will prevent proper adhesion of the stain. This step is really important because stain is essentially translucent color that will not only show the underlying defects or colors variations but can also make them even more visible.

STEP 2: TEST STAIN
Always test the color you choose in a small area to make sure that the result is acceptable. Don’t just rely on the manufacturer’s color chart because stain reacts differently to different types of surfaces. This is especially important if you are working on an intricate pattern with various colors not just applying one color over the entire area.

STEP 3: APPLICATION TECHNIQUES
Apply too little and there won’t be enough color to etch the concrete and last. Spray too much and you will end up with a puddling problem and too dark effect. Practice makes perfect so either test a small area or hire a professional if you are going for a large area and complex design. This requires practice, proper timing.  Generally, you want to apply a first coat using one of the techniques below and finish with a light brush to soften the edges and  make sure the stain is evenly applied before moving to the next section. Some of the techniques are:

Paint with a brush: always start at the perimeter (edge of a wall or building)
Scrubbing: if you are using this technique make sure to maintain a n
atural stroke to avoid streaks
Spraying: this is great when creating flowing patterns that requires loose applications.
Rolling: Great for intricate geometrical patterns like diamond shapes.
Cut lines with a circular saw (1/8” deep) if you are making repeated patterns of different colors. Adding some blue tape in the grooves will help prevent stain of different colors from bleeding into other areas.
Use stencils to create beautiful forms
Use tape to create square tiles for a stone work look
Stamp concrete to create wood board patterns
Simulate bricks patterns and much more…

STEP 4: FINISHING
It is recommended to fully wet and neutralize the area to avoid accidental foot prints or marks. Let it dry fully then add a concrete sealant finish coat. This can be done either spraying, using a cross-hatch rolling, or even buffing if you are going for a wax finish look. Wait at least 4 hours before stepping or moving furniture back.

Artistic Concrete design

Artistic Concrete design

PRO TIPS:
If you have an area that can’t be cleaned, has some defect, you may have to be creative and turn defects or color variations into unique patterns and designs by applying more stain in these areas.

If you have rust stains or have filled cracks, the stain will appear darker in these areas, so plan accordingly.
The best time to apply stain is on a cloudy day. Avoid direct sun on a summer day. High heat will speed up the drying time and make it very difficult to smoothly blend one area into the next without creating color variations and streaks.

So if you have a concrete patio or a slab that is in need of some TLC, try out acid stain. Tackle it yourself or hire a professional and enjoy the results. Check out amazing diy projects and pictures on Pinterest to see how others have transformed their boring floors and patios into gorgeous creations!

Happy New Year!

Share